Maps of Chickamauga
Map Legend
The Battle
The Campaign
Sept. 18th, 1863
Sept. 19th, 1863
Sept. 20th, 1863
Then and Now
Order of Battle
Monuments
Wargaming Chickamauga
Conclusions
Bibliography
|
12:10 PM
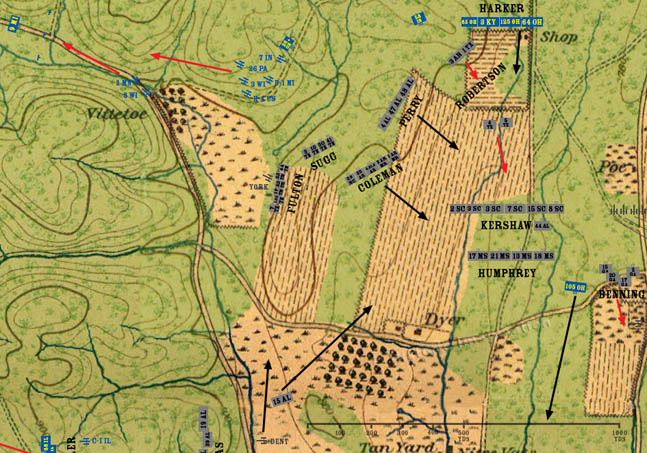
Dyer Field
Sept 20th
At the Blacksmith Shop, the rest of Harker’s brigade comes on line and fires into the remaining regiments of the Texas Brigade. The 64th and 125th Ohio charge, sending the Texans back into Dyer Field. Outflanked on the right by Harker, Perry and Coleman retire their brigade back into the woods to the on the east side of the field. Major General Hood is wounded while trying to rally his old brigade. Despite a conversation between Johnson and Kershaw, nobody assumes command of the corps for the remainder of the battle. Neither does Longstreet appoint one. At best, the separate division commanders attempt to cooperate with each other, but the lack of an overall corps commander will have detrimental consequences for the rest of the afternoon.
To the southwest, Fulton’s brigade crests a ridge overlooking the Vittetoe farm. Next to the farm, the Dry Valley Road runs through a gorge on the way to McFarland Gap. Fleeing Union troops clog the road, and the gorge acts as a natural bottleneck. Fulton calls up York’s Battery, and it shells the gorge. The cannon fire causes a panic and stampede in the already routed Federals. Sugg’s brigade links back up with Fulton.
To the north, the remains of the artillery batteries from the ridge make their way northwest through the woods. However, a remnant of the 26th Ohio, and several cannons of the 7th Indiana Battery rally and make a stand in the woods.
Near the Brotherton farm, the 105th Ohio continues past the Reserve Artillery battalion and into the woods near the Tan Yard. |
|
|